Tuesday, July 27, 2010

Antique Articulated Paper Doll - Della Fox

My newest Victorian Articulated Paper Doll 
(believe to be the actress Della Fox) arrived in the mail today.


After - This is what she looks like after lots of digital repairs

This large Victorian doll was made by L&B (Littauer & Boysen - Berlin c 1887 - 1920) in Germany around the the turn of the century and in this particular example her paper has gotten very brittle over time; so unfortunately she was damaged in shipping and has a broken arm.


Before - This is what she looked like after I took her brads out and scanned her
 She had a few other issues: The vintage brads she was put together with had started to corrode causing some issues to the paper. The holes in the arms were put in the wrong place and the brads used were way to large causing the doll to have huge holes where there should only have been small ones. She also lost part of a finger on the gloved hand that is damaged. However - for being over 100 years old she is still in hanging in there.

This is what she looked like when I pulled her out of the shipping envelope.
Originally when this doll was produced she was intended to come with blue gloved hands and bloomered legs that had blue stockings and shoes to match her bodice. This doll also came in several sizes. The one I purchased is the largest and would make a doll @14 inches tall after she is assembled.


This is what a set of the smallest sized dolls would have originally looked like. Note- the smaller dolls are wearing necklaces. The larger versions of these dolls would be almost identical except that I'm finding that they don't have necklaces.


The great thing about the doll I just received is that she came with black gloved hands and black stockinged legs with ballet slippers. These limbs were originally a separate purchase as a double set you could use with your existing dolls. L&B model number for these were #2785

This is what a set of original Black stocking limbs would have looked like.
I'm still looking to add an uncut set of these to my growing collection.


I was sad to see my new doll had been damaged in shipping; however I still find her to be a lovely addition even with all her flaws. The good thing is I will be able to fix all her issues in photo shop and print good quality pieces to use in my altered art projects.

I'm always looking to add more of these dolls to my collection or for additional information about these L&B Dancing Dolls; so please leave a comment if you can tell me more.

Grins and Giggles
Evelyn (EKDuncan)
Sunday, July 25, 2010

Scenic Stamping - Masking Tutorial

This mini "Masking" tutorial shows how to create a scene using 3 separate rubber stamps and a few stamping supplies.  I've chosen my finished project to be an Artist Trading Card - ATC  and hope you enjoy the post.
 
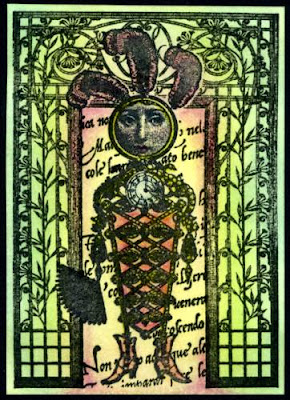
Feather Lady ATC - finished size is 3.5 x 2.5 inches
All stamps are by
Lost Coast Rubber Stamps

(I purchased my stamps along with many of the supplies
used in this tutorial at Blockheads Rubber Stamps.)


This image was created using 3 separate stamp designs by Lost Coast Designs and the masking technique. This process allows you to create overlapping images; where you stamp the items closest to the foreground first and then mask off each successive image before stamping the next image until you reach your furthest background image last.

Masks are created and used to cover or “mask” a previously stamped image so that another stamp image can be added to your scene, without inking over the image/ images you have previously stamped. Masks allow you to layer your stamped scene and gives you greater versatility with your collection of stamp images.

Masks can be created from a variety of items, some of those are: thin paper, post it notes, transparency film, or specialty products such as Masking Magic or Eclipse Masking Tape. These specialty products have a low tack adhesive on the back that allows the mask to stay securely in place while you stamp and then can be remove easily when you are done. Masks can be easily stored to use again and again.

It is best to avoid using cardstock or heavyweight papers for making a stamp mask since these are prone to causing the “halo” effect and will not give you a seamless finish between stamped images. When creating your mask you should consider the thickness of the paper you are using since this will determine how close to the edge you need to trim your image. You will see a “halo” or blank area between the images you are stamping; if the mask is too thick or you did not trim enough of the edge away. The Halo is created when the ink on the new image you are stamping over the mask is not able to make contact with the edge of the previously stamped image. This may be a desired effect in some stamp-work (see the last image of the dragon ATC below); however, I find trimming the mask to slightly inside the stamped edge will allow the images to appear as if they fit seamlessly together once they are stamped.

Tip – With layered stamping it is very helpful to use a stamp positioned so that you can line your images up just where you want them. I favor using the stamp-a-ma-jig but this is a personal preference on my part and it is one tool I’ve never regretted purchasing.

Masking Materials Used

Step 1 – gather your stamping and masking items and consider what you want your stamped scene to look like. For this scene I will be using 3 stamps and I know I want the lady closest to me and the script as the background, so I will stamp the lady first, the gateway second and the script last.

Tip - If you are unsure in what order you wish your scene to be, go ahead and stamp masks for all the stamps you wish to consider using, then you can arrange and move the masks around to compose your scene before you begin stamping.

Step 2 – Stamp your images onto your masking material and trim them slightly within the stamped edge to avoid getting a “halo” as you are stamping. My choice is Eclipse Masking Tape since it is a sturdy lightweight paper that has a light tacky backing that allows my masks to stay in place while I’m stamping. For this project I have stamped a mask for the mannequin and the gateway only; since those are the images that will need to be protected from other images.


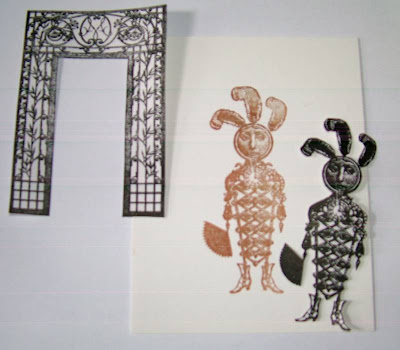
Stamped Lady with Cut Masks
The Lady has been stamped in brown and
the two masks are stamped in black.

Step 3 – Stamp the first image of your scene on the stamping surface of your choice. Remember to stamp the items that will be in the foreground (the closest to you) first. I have stamped the lady in brown ink so you can tell her apart from her masked image which was stamped in black ink. After the ink is dry, apply the matching mask directly over the stamped image so it is protected from the next image to be stamped.


Using the Stamp-A-Ma-Jig stamp positioner
The lady image has already been stamped and masked off.
The new image to be overstamped will be the gateway.
(the mask will protect the first image from other images being stamped around it)

NOTE - I am left-handed so this is the stamping position that works for me, if you are right-handed you might find that flipping the stamp positioner the other way works best for you.

Step 4 – Stamp the next image onto the stamp positioner’s plastic template according to your stamp positioner’s instructions. Line the new image over your masked off image to find the correct placement and then slide the stamp positioner into place and hold it there so it does not move. Remove the plastic template, Ink up your stamp and stamp your next image.

Tip – continue to securely hold the positioner in place while you carefully pull the stamp away. If you did not get a good impression and the postitioner has not been shifted out of place, you can re-stamp the image. It can be a bit tricky to do but I’ve had an excellent success rate in doing this.

Background Stamping of the Last Image
This is the final image being stamped the background text stamp.

Step 5 – Repeat this process (stamp, mask, find the placement of the next stamp) with all your images, remembering to add the mask to a previously stamped image before stamping the next image. Also remember to protect any surrounding areas your masks may not cover. In this project, I realized that the final background script stamp would accidentally stamp an area outside the gateway on several sides so I protected the outside edges of the entire work area with pink note cards before stamping the last image. This is a good way to recycle scrap paper or old post-it notes before you throw them away.


Feather Lady in the Gateway

Step 6 – Remove all the masking materials to see your stamped design area. I have stamped these three items with different colors of ink so you can easily see that 3 stamps were used to create this composite design. The masks protected each individual image so that it appears that the fancy lady is in front of the gateway and that there is a slightly tilted scrip message behind the gateway.

Tip – Keep your masks for another time. You have gone through the trouble of stamping and cutting out your masks so save them to use again. It does not matter that they have been stamped over in this project since they will still protect each image many more times going forward. Most of my stamps are unmounted and kept in note books so I keep my masks in sheet protectors with my stamps so I can easily find them for the next time.


The Finished - Feather Lady ATC
The finished ATC was stamped all in black.

This ATC was created using 3 separate stamp designs by Lost Coast Designs, using the masking technique. To create this ATC; I first stamped the feather lady from the Mini Flying Ladies Set.
Once the ink had dried on the lady I masked her off and then stamped the gateway.
The gateway was then masked off and the script text was stamped in the background.
I removed the masks and colored the ATC with a combination of pastel pencils, decorative chalk and markers.

All stamps by Lost Coast Designs
-Mini flying Ladies Set
-ATC Shrines
-Word Backgrounds for ATC’s Set 1Masking medium was Eclipse Masking Tape
Stamping ink was Versafine in Onyx Black.

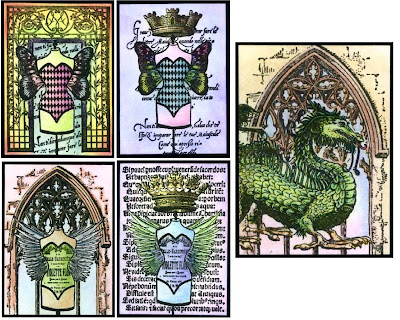
Additional ATC's using the masking technique and Loast Coast Rubber Stamp Images

I've added wings on all 4 and crowns to 2 then
a fun background to each of the mannequins.


I extended the mask out just a bit on the dragon's head
to create a bit of a "halo" effect to make it appear as if he is
head butting and breaking out of the window.


Grins and Giggles,
Evelyn (EKDuncan)

Saturday, July 24, 2010

Scenic Stamping - The Bits and Pieces

The bits and pieces and how they get pulled together is what I like best about scenic stamping. I enjoy the whole process of thinking through a potential concept, finding the right images, working through the placement and then the mechanics of getting the final product on paper.


"Spooky" - My take on a Monster Mash Party
All stamps are by Stamp Francisco, most are from the Bartholomews Ink line of stamps


The purist version of scenic stamping has the artist stamping and over-stamping images using the masking technique. This process allows you to create overlapping images where you stamp the items closest to the foreground first and then mask off each successive image before stamping the next image until you reach your furthest background image last.

Masks are created and used to cover or “mask” a previously stamped image so that another stamp image can be added to your scene, without inking over the image/ images you have previously stamped. Masks allow you to layer your stamped scene and gives you greater versatility with your collection of stamp images.

Creating a scene is like putting a puzzle together. I photograph my layout once I've put all the puzzle pieces where I want them, so I have a reference point as I stamp it out.

I create my masks from thin paper, post-it notes or by using this great product called Eclipse Masking Paper. These masks serve double duty since I first use them to create my layout and then I use them to protect the images as I stamp out the scene.

(I use my masks multiple time before they need to be replaced. This is why you see odd stamping lines on the above characters. This shows how the masks protect an image when you are stamping other images around them).

******************************


These are a few other scenes I have created
using
Stamp Francisco rubber stamps.
(All the scenes were colored with pastel pencils and decorative chalks)


"The Library" 16 Stamp Francisco stamp images were used to create this scene.
(I designed several of the furniture pieces in this scene for Stamp Francisco:
The bookcases, window, desk, both lamps and rug are EKDuncan designs)


"The Pink Room" 11 Stamp Francisco stamps were used to create this scene.
(I designed several of the furniture pieces in this scene for Stamp Francisco:
The marble floor, ceiling beams, ceiling fan, lamp and
door are
EKDuncan designs)

********************************************


These are a few "works in progress"

This is to be a Garden of Eden type scene once I get it all worked out.
The stamp images are by various companies.
Stampscapes, Third Coast Rubber, Stamp Francisco & Marks of Distinction


"On the Cat Walk" this one has been on my back burner
for a while as I'm still trying to find some more
background stamps to finish it off.
The stamp images are by various companies:
100 Proof Press, Beeswax Rubber Stamps, Cherry Pie Stamps


Grins and Giggles,
Evelyn (EKDuncan)

Friday, July 23, 2010

An Adventurous Quest in Scenic Stamping

1000 years ago ladies of old told their stories by creating tapestries. The modern stamper has replaced needle and thread for ink and rubber but the end result is the same. Our canvas is meant to entertain as it tells our story.

When I have a lot of time to stamp, I enjoy throwing myself into Scenic Stamping. This is something I'm still fairly new at and I keep trying to push my boundaries each time I create a scene.

"Dark and Stormy Night" was my first large stamped scene.
I used 20 rubber stamps to create this 10 x 8.5 inch scene.
All Stamps are by Stamp Francisco the Barthomews Ink line of stamps.


The old saying that a picture is worth a thousand words is well applied to this form of stamping since it is a visual story-telling. Sometimes the story makes sense and sometimes the story is surreal but either way I find them all to be most entertaining.


******************************************


"Atlantis under the Sea" was my first scenic lampshade creation.
All stamps are by 100 Proof Press Rubber Stamps

It's fun to mount and frame scenic art but last year I wanted to take it one step further and decided to try stamping scenes on mini lampshades. This way my artwork could be functional as well as fun to look at. I was so thrilled at the way this first one came out that I created a few more and entered them into 100 Proof Press's Rubber Stamps contest for July 2009. Lucky for me I won one of the prizes and got to add more of their great stamps to my growing 100 Proof Press collection.

I enjoy going to thrift stores to pick up these mini lampshades and bases whenever I can find them. It is a very economical way to create this kind of art and it's "green" since I'm recycling someone else's trash into my treasure. Also you can use a 12 x 12 sheet of paper on the diagonal to cover one of these small lampshades.


***********************************


I'm constantly amazed at the scenic artwork other stampers produce. I enjoy seeking out their latest creations and am continually inspired by them.

Most rubber stamp sites have a gallery of artwork to give you ideas and let you see what others have created. There are also online groups you can join like Scene Stampers and Stampscapes Yahoo groups for even more inspiration.


Here are just a few of my favorite Rubber Stamp sites I go to when I need inspiration:

Stampscapes -

Stamp Art by Kevin Nakagawa
(I find Kevin Nakagawa's work to be breath taking
and his site has great tutorials).


Beeswax Rubber Stamps -

Stamp Art by Sulea Lee
(There are a variety of amazing scenic artist's work here.
Some of my favorites are by: Diana Collier, Mark Roseboom,
and Sulea Lee to name a few).


Stamp Art by Rebecca Stiles
(There is so much great scenic artwork to view at this site.
Some of my favorite artists work is by: Diana Collier, Kristina Louthan, Louise Rocheleau, Beverly Shupp, Rebecca Stiles and Hannamaija Teisko to name a handful).


I believe that no man or woman's stamp artwork is an island. We all get inspiration from others and then the circle continues as we inspire others in return. It is an ever evolving process that I'm glad to be a participant in. I thank all those who continue to inspire me and hope my work might do the same for someone else.

Grins and Giggles,
Evelyn (EKDuncan)

You can see more samples of my scenic stamping at:
http://www.flickr.com/photos/ekduncan/sets/72157623528411357/

Thursday, July 22, 2010

Game Piece Tutorial - Coloring images on plastic with Pigment Markers

One of my favorite art projects is to rubber stamp on dominos and other game tiles.

Domino Art includes most game piece tiles that can be decorated or altered in some way or another. I usually rubber stamp my tiles and I use a variety of game pieces such as dominos, triominos, chekit and vintage rummikub tiles to create my Wearable Domino Art projects.

This is a collection of Dominos I stamped and colored using
Third Coast Rubber Stamps and Permanent markers.


Dominos are a great way to get started since they are readily available and don't have to cost a lot to purchase. They come in a variety of sizes and are great for turning into wearable art.


Game Piece Tutorial - Coloring images on plastic with Pigment Markers

Pigment ink marker are perfect for coloring on game tiles, since they give you a little play room before they dry and are not as likely to remove your stamping lines if you accidentally get to close to them when you color the image. Other non- pigment markers can be used if you are careful and seal your finished project properly but I find the pigment markers to be the best for this project.

Several companies make a pigment marker you just want look for the word Pigment on the pen or choose Adirondack pens by Ranger (they do not list the word pigment but Adirondack pens are a pigment ink and my choice for muted antique looking colors).

If you can’t get Adirondack Pigment Pens, other Pigment ink marker choices currently available are: LePlume Pigmented by Marvy – Zig Pigment Ink – Pigment Pro by American Crafts.

Note #1 - It is possible to color in images using a sharpie pen; however you need to stay clear of the stamped lines or the alcohol in the Sharpie ink will cause the stamped lines to disappear. If you spray the inked image with your sealer before coloring with a sharpie pen it will give you a little bit of added protection from erasing your stamped lines.

Note #2 –Non-pigment markers like Le Plume II or other rubber stam
ping markers that are dye ink based do not dry on non-porous or plastic surfaces so they are not a good choice for this project.


Supplies:

  • Dominos or other plastic game tile - Rummikub (rectangle), Triomino (triangle) or Chekit (hexagon)
  • Staz-On Black Ink
  • Third Coast Rubber Stamp Images (as listed below)
  • A variety of Adirondack or Pigment Markers
  • Krylon Workable Fixatif spray sealer
  • Krylon UV Resistant Clear spray
  • Black Sharpie Magnum Pen for edging the dominos (Optional for the sides)
  • Black Sharpie Super Twin Tip with Chisel edge (Optional for the top edging on the domino)
  • Rubbing alcohol & cotton pad – to clean game piece before you stamp it
  • Cotton swab dampened with water – to clean up any ink smudges before they dry
  • Baby wipes or damp paper towel to clean your fingers
  • Heat Gun (Please see Safety Note below)
* SAFETY NOTE - Follow the manufacturers instructions for your particular model of heat gun - Always place your game tile in or on a heat safe surface before using the heat tool and remember to let it cool before touching it. The plastic will get super hot!!!

Step 1
- Start by wiping each game tile or domino with a bit of rubbing alcohol on a cotton pad
(This gives you a clean starting surface on which to stamp and color).

Step 2 - Stamp your image onto the game pieces using Staz-On ink or another solvent based ink that will dry on plastic.


Tip for stamping – I find I get a sharper image and better placement if I first ink the stamp: then press the game piece into the inked stamp. Get a good grip on the game tile and lift the game piece straight off the stamp.


All Stamp Images are by Third Coast Rubber Stamps
FT-206-K Sarosh Observes FA-232-C Pepin the Piper
FA-226-I Owls on Fence FT-374-I Relaxing Beauty

The game tiles: (regulation sized Domino,Vintage Rummikub tile, Triomino, Checkit domino tile)


Step 3 - Heat set the ink with a heat tool to make it more durable for the coloring process. If you do not have a heat tool you can use a hairdryer on the hottest setting for this. * See Safety Note above.


Step 4 - Color small areas at a time with the pigment markers trying not to go over the inked lines too often. (Constantly coloring over the lines may lighten or totally erase them from you piece).

FT-206-K Sarosh Observes was colored with the following Adirondack Colors:
Skin (Latte) - Hair/Beard (Ginger) - Sword Hilt (Butterscotch)
Turban (Currant) - Robe (Pesto)


The lighter shades are by daubing the color and the darker shades
are by going back
in with the same color at full strength.


Step 5 - You can soften the color and avoid pen line marks by lightly tapping or daubing over the still wet ink with your finger tips. This will lighten and lift some of the ink off but you can keep adding color and tapping in layers till you get the depth of color you want. Use the baby wipe or damp paper towel to keep your fingers clean as you work at daubing the colors on the image. If you smudge some color where you don’t want it, quickly clean it up with a slightly damp cotton swab.


The background can be left natural or you can choose to color it as well.
Tip - I find it works better to do the background color first
if you want a background color.


Step 6 - Heat set with heat gun to bake in the color. Once the piece has cooled, edge the sides with a black sharpie marker, leafing pen or pigment marker color of your choice.

Black Edging Tip - If you want the black edging the quick simple I have found it to use a big Sharpie Magnum Pen on the flat side edges and the Sharpie Super Twin Tip chisel end to do the top edging.

Step 7 - Lightly spray a coat of Krylon Workable Fixatif spray sealer over the piece and let dry. (I like to do this to put a protective barrier between my inks and my clear coat sealer; since most spray sealers have alcohol in them which could cause the colors in the image run together).

Step 8 - After the Fixatif is dry I give the game piece 2 light coats of Krylon UV Resistant Clear spray, remembering to let each coat dry before applying the next coat. (It is best to spray several light coats instead of one heavy coat to protect your artwork properly).


A few alternative sealing methods:

- Use a liquid glaze like Liquid Lacquer or Diamond Glaze which will form a tough shiny shell over your work.

- Sponge or brush a coat of water-based sealer like Mod Podge Matte or Gloss depending on the finish style you like. Sometimes this type of product dries a bit tacky to the touch but a light coat of spray acrylic sealer will resolve that if it is a problem for you.

- I’ve even know some people to use Future Floor Sealer or polyurethane on there pieces, so you might want to test out what you have around in your craft supplies or around the house to find what works best for you.


*****************************************************


A few ideas on what you can do with your game piece art:

  • Wearable Art - Create jewelry pieces such as pendants and pins. Glue a bead or pin back to the piece with E6000 or Super Glue for an easy method. If you are really industrious you can drill holes in the game pieces so you can turn them into beaded bracelets or necklaces.


  • ATC’s – mini sized dominos and the Rummikub game tiles are perfect for accenting your ATC (Artist Trading Cards) since they are just under ¼ inch thick, half the thickness of a regular domino.


  • Mirror Toppers – You can line up a series of art dominos along the top for a framed mirror or picture as a whimsical accent. The top edge of the frame makes a great ledge to sit the dominos on and they can be removed or changed out will not fuss or messy clean up since they are just sitting there.


  • Framed Artwork – You can add your game piece art to your shadowbox projects or frame it. Shadow box frames can be purchased at your local craft store or you can use a regular frame where the glass has been removed. Insert black mat board in place of a picture and then glue your game piece art to the mat board. Frame individual items or a whole group.


I hope this inspires you to pull out your ink, stamps and old game tiles to create your own domino art.

Grins and Giggles,
Evelyn (EKDuncan)

Wednesday, July 21, 2010

A New Quest Begins...

Vintage Victorian Paper Doll
One of several antique paper dolls I'm on the Quest to add to my collection


I'm an avid reader of historical romances and I especially enjoy a good medieval tale that has a handsome knight on some grand quest. My personal journey in creating artwork is similar in that I too am on a quest... A quest for the fanciful, quirky and whimsical in my art.

I never know where my muse will take me or what might inspire me but it continues to be an incredible journey of chasing rainbows. I dabble and play with one interest for a while and then I'm off to something else, till the next inspiration is on me and I'm off again. Then I might go through a dry spell where I'd rather read or do other things till my muse kicks me in gear again. I wanted to create a space where I could share this journey and if I'm lucky pass a little inspiration along the way.

**************************************************


I'm in the ongoing process of collecting a special antique paper doll. These very cool articulated paper dolls were made by L&B and Dennison about 100 years ago. I think they are amazing and unfortunately are becoming an expensive hobby for me, but I really love these dolls and they inspire me to create so they are worth the hassle and expense to keep growing my collection. They also have a bit of history behind them since each doll represents an actress, opera singer, or member of royalty from that time period.

The L&B dolls I'm collecting were made in Germany around 1880 - 1910 and each is a heavy, glossy lithographic art work also know as Victorian Scraps. They create a doll @ 14 tall once assembled using brads after adding a torso. Then the fun begins...you decorate the doll (or at least that is what the girls of the day did and it's still a great idea).


Victorian Paper Doll by L&B
This was the very first original Ballerina Doll that started my collection and she is still my favorite. My loving hubby bought her for me this past Christmas - 2009. I believe she represents Alexandra Princess of Denmark who later became Queen Alexandra of England after she married Edward VII. She had a scar on her neck due to a childhood accident so she always wore a tall collar of pearls to conceal it.
(some list this doll as actress Lillie Langtry)


Before I started collecting originals I discovered this
high quality scanned set of dolls at
http://www.victorianornaments.com/Make%20Ornament.html

I started printing and playing with these and had so much fun I wanted more of the pretty ladies but sad to say it is very hard to find high resolution images of any of these old Victorian Paper Dolls on-line. Which is why I'm on my "Quest" to collect as many of these original dolls as I can.


Here are some fun ATC's I created using the above dolls. They are from my Corset Doll Collection of ATC's. The brads allow them to swivel closed to conform to the correct 2 1/2 x 3 1/2 inch size of the ATC (Artist Trading Card)

You can see more of the corset doll ATC collection at
http://www.flickr.com/photos/ekduncan/sets/72157608576892674/


These 100 year old paper dolls inspired me to keep creating more art dolls. I started by creating a generic body template and a few hairstyles then I found great rubber stamps to add faces and create funky outfits for my modern paper dolls. I've even been lucky enough to win a few contests with some of these creations.


These 6 Dolls were my contest entry for 100 Proof Press Rubber Stamps Press it out Contest back in Dec 2009. I loved the concept of taking stamps and using them in a non traditional way from what they were intended. All the skirts are made from architectural elements. I created the doll body and hair styles but all the other elements are rubber stamped images.
All the stamps used for these 6 dolls are by 100 Proof Press Rubber Stamps.


I created this fun folding Fairy ATC for a contest
with Blockheads Rubber Stamps.
The background, hair, crown and clothes are all made
from Blockheads Rubber Stamp images.
In the closed position the ATC is 3 1/2 x 2 1/2 inches. So she is a tiny fairy doll.


My most recent art doll project was done using stamps by Scrolls Work Rubber Stamp images to create these two huge dolls. They are mounted on 8 1/2 x 11 backgrounds so this shows you how big they really are.

You can find out more about these dolls at
http://www.flickr.com/photos/ekduncan/sets/72157623529657529/


I currently have 4 original L&B Ballerinas and Prima Donnas in my collection. Some of them are mismatched sets but I don't care since I want to eventually own as many of the various parts and pieces I can get my hands on. I hope in the end to have them all. Yes - I dream big.

I'm sure I'll be creating more art dolls and I'll keep adding those antique L&B dolls to my growing collection, so check in from time to time to see what I've found or what I've created as my Quest for the odd and unusual continues.

Grins and Giggles,
Evelyn (EKDuncan)