Sunday, February 27, 2011

Steampunk Queen - Digital Stage Creation

I've been having a blast playing with my PaperWhimsy images and have a new piece of digital art to share.

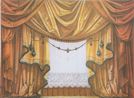
To be honest - I was working on a St. Patrick's Day project but it went a bit off kilter, so with a bit of tinkering; I dropped the St. Patrick's theme and just focused on the Steampunk aspect.  The end result was my Steampunk Queen on Stage.

I find it interesting how sometimes when you've made an artistic mistake and then find a creative solution to fixing the problem; the end result is actually a better piece of artwork.  For me this would be one of those instances and in the process I was able to create two pieces of art.  The one I'm showing in this post and then I'll post my other creation in a few days.  I'll even share what the artwork started out to be, how I changed it in Photoshop, and some alternate endings.

Please keep in mind that I'm new to working with Photoshop and that there are may ways to create effects in that program.  I'm just showing the journey I took to create my staged scene.  I hope you enjoy viewing my latest artistic quest!

Steampunk Queen 
This Scene was created using an assortment of great digital images from PaperWhimsy 
and layer upon layer of modifications and alterations in Photoshop.
(see below for a listing of PaperWhimsy images used )


 Here is a close up view of my Queen and her Steampunk gears.  
She reminds me of an old-fashion automaton where you pull back the dressing 
and you get to see how it works.  In this case "the works" are part of the art.

The skirt was created by using the "warp" function in Photoshop.
The floor in the skirt and on the stage was done by using the "warp" and "smooshing"
(See my previous post to learn more about how this is done - click HERE)

The background is  PaperWhimsy -Damask 05 JPG
I've altered the color and reduced it's intensity.

TIP - Don't rule out purchasing an item due to it's color.  
There are a variety of ways to alter the color of an item digitally.
I loved this Damask pattern and its vintage feel but I needed a more muted color.

Here is how I choose to give it a different.

Selective Color Menu
 I started with the original background as seen on the left 
and then made changes in the Layers Pallet
- Create New Fill or Adjustment Layer ( the little half moon symbol)
- Select Color
-Colors: Reds (I'm only altering the red tones in the background)
change the following values to:
  • Cyan  +76
  • Magenta 0
  • Yellow +18
  • Black 0
  •  
     I wanted a more muted background and achieved this 
    with the Exposure setting
    Exposure Menu
     I went back into the
    Create New Fill or Adjustment Layer ( the little half moon symbol)
    -Exposure
    • Exposure: -1.27
    • Offset: +0.0803
    • Gamma Correction: 0.89
    A few clicks of the mouse later I had the background I wanted.


    *****

    Here are the PaperWhimsy digital images I used.
    (All were from the PaperWhimsy: Hybrid Images - Digital Artist shoppe)


    I digitally altered her garment in a few ways and changed her hair color.


    I played the role of digital beautician and seamstress here
     Via the magic of Photoshop I erased, cloned and colored this fair maiden the way I needed her.
    I was able to finish off her sleeve, remove portions of her garment that were not needed as well as change her hair and clothing color.  

    Yes - originally my project required her in shamrock green, 
    so that was how I originally created her.


     I used this image for my stage and for the Queen's skirt
    I altered the color and removed the tassel embellishment in Photoshop.
    - For the skirt: I used the "warp" mode to re-shape it
    (See my previous post to learn how this was done - click HERE)
    - For the stage: I made it wider via the Edit - Free Transform mode.

    How I widened the image to make a stage


    I used the bottom crown with a bit of customization.

    I customized the crown for my project
    A bit of color alteration and then "Warp" was used to re-shape the crown.
    Edit - Transform - Warp...a bit of time and I have an new look.


    This was used for the stage background and floor as well as for the floor in the skirt.
    The both floors were done by "smooshing" and "warp"
    (See my previous post to learn more about how this is done - click HERE)

    The Harlequin was the base layer 
    The map (listed below) was the top layer and set for 33% opacity.
    Once both layers were on the screen;
    I changed the Exposure via the adjustments layer (half moon symbol)
    Exposure: -0.02
    Offset: -0.2529
    Gamma Correction: 0.77

     This was used in the Stage Background along with 
    Harlequin 01 listed above.

    It was also the stage background in the Queen's skirt.
    but it was colored with Texture 05 using the FX mode after
    I saved this background into my patterns pallet.
    Via - EDIT - Define Pattern

    Map Layers

     I used this texture to color the map that is the 
    stage background inside the Queens skirt.
     

    I used several cogs in the skirt scene.  
    overlayed some on top of others then rotated them around a bit.  
    I added drop shadow in the FX screen to give them a bit more depth.


    PaperWhimsy - Botanique 13 PNG
    I used this Peony flower on the bottom of the skirt and "smooshed" it a bit so it 
    looked like it was laying flatter on the floor than the original.  
    I also added a bud from Botanique 14 listed above.
     

    I used the lower section of stars and rotated them.


     *****

    OK - Here is what the original scene looked like
    (the one I did not like since I felt the Shamrock Green and Fairy wings 
    seemed to take away from the Steampunk look)

    This was the original scene that I choose to re-work
    I  just had too much going on here. The bright St. Patrick's green, fairy wings and butterflies were in conflict with the Steampunk elements.  I prefer Steampunk to be in muted colors; which I did with the stage and background.  Then of the flip side the "fairy" statment gets lost in all the surrounding elements. I thought this scene was OK but really needed to be reworked. 

    The re-worked scene - final version
    I believe removing the wings, butterflies, and changing her gown color made a world of difference.

     
    making a quick color change
     With a few clicks and mouse moves I had my Queen in a nice 
    Steampunky plum colored gown.
    I find this process works best if the original color you are trying to change is either Green or Blue.
    Yellow and Red are the hardest to alter on a figure that is a flattened PNG or JPEG image since that has a tendency to mess with skin tone, hair color and make-up.  Luckily I originally painted her gown green so it made the transaction virtually painless.

    Side Note:
    Unfortunately for me when I originally colored my lady I saved her upper body and then full body as PNG files and somehow forgot to save the PSD file that housed all the coloring layers.  This left me with a "flattened" image and I choose Hue/Saturation as the best way for me to quickly recolor my lady.  I would have had  more re-colorizing options available to me had I saved my PSD file for the coloring process of my lady.  It's one of those instances of "Live and Learn" and one of many mistakes I've made along the way as I learn Photoshop - thankfully the Hue / Saturation trick got me out of this pinch.


     I played around with a few other color options before settling on the plum gown color.
    These other options were arrived at with just a slight slide of the Hue bar.
    (I think it's fun to see how a scene can change based on wardrobe color change).

    All of these made good Steampunk colors 
    but I thought the Plum was the best final choice.

    Here again it goes to show that if you don't like the color of something for your project 
    there are ways to change it digitally into something that will work for you.

    *****

    Again, A special thanks to PaperWhimsy for creating great images to play with.


    For any or all of these PaperWhimsy images
    click HERE
    For Inspirational ideas from Paper Whimsy 
    click HERE
    For the PaperWhimsy Blog
    click HERE
    Thanks for taking a look at my latest creation.
    I hope it brightened your day and inspires you to create 
    something fun for the Grins and Giggles of it


    Oh - and check back in a few days to see what I finally did with that Shamrock Green Fairy...
    She got a face lift herself and a great woodland scene that's perfect for St. Patrick's Day.


    Grins and Giggles,
      Evelyn

    Saturday, February 26, 2011

    KittyCat Masquerade

    I've spent the last few weeks practicing my Photoshop skills and playing with new functions; like "Warp" on the Edit menu just to see some of the creative ways I can alter images.  I'm all about using an image to its maximum capabilities and have learned how to recolor them in a multitude of ways and now I'm learning to transform their shapes to give me even greater diversity in how they can be used to create art.


    I have 3 kitties that are total show-offs, so I combined that with 
    my love of paper dolls and antique "toy theaters" to create
    this fun scene in Photoshop.

    KittyCat Masquerade

    I had a lot of fun altering colors and shapes of some really cool 
    PaperWhimsy images in my digital collection to get to this final scene.
    Most especially the "Warp" feature to create: the skirt, bodice & stage floor.

    ..."Warp" is my new best friend - giggles.


    So Here is how I did it!

    First I started off with some great images from 
    PaperWhimsy and a Victorian paper scrap Kitty.

    These are the images I used in this project

    Victorian Paper Scrap Kitty
     I love the fact that this 100+ year old cat image is living another life in the digital age.


    All of the PaperWhimsy images I used came from their 
    "Hybrid Images - Digital Artist" line of products


    This was used as the stage backdrop and its floor
    I altered the color of this image in Photoshop for the backdrop and I also
    duplicated it in another layer, "smooshed" it and added 
    "warp" to create the floor of the stage. 

    The bodice of the cat's dress was also made using 
    this image and the "warp" function.


    This image was used as the stage to frame my Glitter Kitty.
    I altered the color and removed the tassel embellishment in Photoshop. 
    I also split the image in half to make it easier to form my stage curtains.


     I used the lower red masque.
    Yes, I altered the color a bit to better match my scene.


     I used the middle section of stars.
    Once as you see them here and then a duplicate
    layer "smooshed" to create the swirl on the floor.

    I used this texture as the basis of my color scheme and
    it was used as a "coloring layer" on the bodice, skirt and mask.

     The "Warp" function was used in Photoshop
    to give this image the shape of a skirt.


    The middle round flower was used to 
    create the decoration on the skirt waist band.
    I altered the flowers color and used a slightly larger flower
    in the center on a top layer in Photoshop.


     I used the center tree multiple time to create 
    the star shape behind the cat on stage.


    Now that I have listed my supplies, here is a bit more detail on how 
    I made my alterations in Photoshop to create this scene.

    Using "Warp" to Create the Skirt.
    The Skirt was created by placing the  
    into  Photoshop and then selecting Edit - Transform - Warp


    A grid appears over the element and by moving the various points around
    I was able to narrow the top to make a waist and then bring in the
    bottom a bit to give a skirt shape to the map image. 

    Once I get the image where I want it I click the check mark at the top 
    of the page and move on to my next function.

     Adding Texture and Pattern to my Image
    I then wanted my skirt to take on the color and texture of my  
    I chose to do this by adding that image to my Pattern selector in Photoshop.
    This was done by "opening" the pattern in Photoshop 
    then selecting: Edit - Define Pattern 

    (I have created a PaperWhimsy Pattens Pallet in my Photoshop storehouse
    so I can use these patterns and textures at will to change the look 
    of other items with a few clicks of the mouse.) 


    Now that the patten is in my Photoshop pattern selector 
    I can easily add it as a "color" layer to my map skirt.

    I did this by creating a duplicate layer of my skirt.
    Selecting the FX function on the layers pallet
    Selecting - Pattern Overlay
    Selecting - "Color" in the Blend Mode
    Selecting - PaperWhimsy - Texture 7 

    (I had to move the pattern around till I got to a section of color I liked)

    I wanted a bit more texture so while still in this screen I
    Selected - Bevel and Emboss
    Selected - Texture
     This did not effect color it just added more of the same texture to the image
    and gave me the option of adjusting the scale or depth of that texture.


    Repeating the techniques for the skirt; I created a bodice with
    Then once I pieced in my kitty, I used the "Warp" function to
    "fit" the bodice shape to the kitty image.

    The Kitty was created from parts and pieces of the original image, 
    each altered and rotated as needed to repose it as seen here.


    I added embellishments, softened some edges and corners, 
    added drop shadows where needed; till she was ready to go on stage.

    The background layer behind the kitty is also by 
    I created a plain pale rose background then added the Damask Pattern 
    as another layer under the Pale Rose.  I then reduced the opacity of the Pale Rose
    top layer so a bit the damask pattern would show through. 


     Corner Rounding Trick


    Select the image or layer you want rounded - make it the Active layer on your layers pallet.
    Select the Rounded Rectangle Tool
    Make sure the "Path" is active - a top toolbar icon
    Set the Radius to create the size of curve you want - I used 30px
    Then draw the area you want
    Select Layer - Vector Mask - Current path

    (if this function does not work, make sure the layer you are working 
    with is not locked. If it is locked double click on the layer name 
    (this will rename it and unlock it) then try again.


    To Set the Stage
     
    I started to create a backdrop for my Masquerade Kitty by playing around with
    Then I merged all 4 layers into one layer.

    I duplicated that layer, then using the Freeform function on the Edit menu 
    I made the duplicate layer smaller and rotated it to form a star shape.


    I then added in my Kitty, dropped in some other elements and made 
    adjustments as needed to build the stage for her.

    to create the main backdrop and stage floor.
    The color was changed in Photoshop using a Gradient Overlay 
    in the FX section of the layers pallet 

    Then I created a duplicate layer of the background, which 
    I smooshed and used "warp" to create the stage floor.
    The "smooshing" factor compresses the image making it appear to lay flatter.
    The "warp" allows me to create perspective by fanning out the front, 
    so the floor appears to be farther away where it meets the backdrop.


    "Smooshing"
    Smooshing is done by using the Edit - Free Transform function 
    Then pressing down or pulling down using your mouse.  
    This causes the image to "smoosh" down, causing a flattening effect

    The image to the Right is what the PaperWhimsy - Elements: Stars 02 PNG
    elements look like before being "smooshed"
    I used the regular stars on the upper portion of the Kitty and 
    the altered version to create a star swirl on the floor.

    Put them all together and I have my very own Show Cat

    It is so much fun to take an object and alter it into something else.  
    I've done this for years with my rubber stamps; finding new ways to interpret 
    an image and create something outside of the box with it.  

    The great thing about Photoshop is that I can expound on that many times over 
    using features like "warp" -  which lets me take advantage of altering
    my images and getting so much more bang for my buck on my digital purchases. 


    I need to keep practicing what I've learned in Photoshop so I don't forget
    how to do these functions, so you will probably be seeing more of 
    these types of collages for some time.


    ***

    How I was Inspired

    Recently I've been making digital image purchases and gleaning inspiration 
    from PaperWhimsy's "Inspire" pages portion of their website.

    I love curtains and stages since they remind me of antique toy theaters, 
    and the line of PaperWhimsy images has made it so easy for me to create 
    a bit of that nostalgic "two pence coloured" theater look of my own.
    (See my previous post about vintage toy theaters by clicking HERE)

    I've especially enjoyed seeing the collage creations 
    Rande Hanson has come up with for PaperWhimsy,
    since so many of them put a smile on my face

    Here is one of Rande's  recent Staged Lady Scenes


    Many thanks to PaperWhimsy and Rande Hanson for sparking my interest 
    with great images and fun collages.

    For great digital images to stage your own scene by PaperWhimsy
    click HERE
    For Inspirational ideas from Paper Whimsy 
    click HERE
    For the PaperWhimsy Blog
    click HERE
    And for even more Inspiration see blog by Gale of PaperWhimsy
    click HERE
    I love the July 27th "Dumpster Art" posting

    Check them all out - I know you'll be glad you did!


    I hope this inspires you to create some fun digital scenes of your own.
    Please feel free to leave me a comment and a link to your creations,
    since I'd love to see what others are creating

    Grins and Giggles,
     Evelyn

    Thursday, February 24, 2011

    Vintage ToyTheaters - Penny Plain and Two Pence Coloured

    I have a passion for all things vintage... Regency, Victorian, Medieval - European, Egyptian, Celtic, Russian and on and on.  I love reading historical romances and the images of ruffled fashions, enormous draped windows, flounces, ribbons, bows and jewels of all types. I'm also fascinated with a variety of  architectural images and elements like ironwork and vintage printers flourishes and ornaments.

    There are times I can't help but wonder if I was just born in the wrong time period... till I think about how much I would miss things like my computer and certain civilized necessities of life we take for granted today.

    So since I can't live in another time or place; I like to collect or view things with vintage character.  Many of my previous posts are about my antique Victorian paper doll collection.  Luckily they do not take up a great deal of space and are easy to duplicate via a scanner, printer or digital computer program.  However another of my interests "Toy Theaters" are not easy to collect and therefore I have not been able to house a collection of my own.  One of the reasons I wanted to learn Photoshop was so I could create fun digital images that are reminiscent of real Toy Theaters and slowly I've been building a collection of digital images so I could create my own world of these amazing treasures.


    Example of a lavish Toy Theater
     Toy Theaters date back to the late 18th century and were the imaginational playground for many affluent children and adults during the height of their popularity. The best examples are large, lavishly created from wood, metal and high quality screen prints that make up the background scenes and cover the theaters themselves.  


    Example of a modest theater
     For those of more moderate means the theaters were smaller and of more common materials. 
    These un-assembled kits were sold at concession stands at European Opera Houses and Theaters and were usually printed on paperboard sheets.  These kits included the theater, several scenes, curtains and the players so you could assemble and re-enact the play or opera at home.


    The mass produced toy theater kits came as " penny plain" or "two pence coloured".
    The "penny plain" were black and white images that you could then color yourself.


    Picture from the Valley Light Opera Website
    A few of the original makers of these kits are still in business today. 
    Replicas can be purchase in several sizes, with a variety of scenes, curtains and props available.


    Pollock's Toy Store has been selling these theaters since the 1800's


    Toy Theaters have also been called Paper Theaters and Model Theaters. There are several companies that produce a variety of items for the toy theater hobbiest and collector. Such as my favorite...Curtains. Unfortunately most of what I have found available are way too large for me to use in my crafting projects or to scan but I hope that one day soon some of these will be available as digital downloads.

    One of the curtains I'd love to own but is way to large at
    17 x 12 inches.
    (sorry but their website only posts very low quality image of their products)

    Lucky for me there are other great resources on the web where I can acquire bits and parts of stage pieces to craft with.  Most recently I've found several great items at PaperWhimsy.com and will be playing and creating with those in the very near future. 

    I hope you drop back by to see what I've created in the spirit of the Toy Theater.


    Grins and Giggles,
     Evelyn