Monday, January 17, 2011

My First Digital Creation using an iPhone

There are times when I'm traveling and want to craft but don't have any art supplies with me; so I was intrigued when I read an article in the Autumn 2010 Somerset Digital Studio Magazine by Nettie Edwards, titled: Designing Digitally with your iPhone...  Naturally I swiped my hubbies iPhone, downloaded the necessary applications and started to play away.


This is my first digital iPhone art creation.


And here is how I did it.


 I started by taking a photo using the iPhone (3GS)


Then I opened the PhotoStudio Application - the first icon listed.
(All the icons you see here are the photography applications 
I purchased so I could be creative on the go).


 This is what my iPhone screen looked like after I uploaded my photo.
I then selected the FX icon up top.


 I scrolled through all the effects available and started by selecting 
163 - Vignette White 2


 I really liked the way the cloudy effect masked 
the doorway and the chair while highlighting the fireplace.


 The next FX layer I added was under
Categories - Color Fantasy
3 - Lemoore


 Here again this option continued put the emphasis on the
fireplace and hid the images to the side.


Next I added an Overlay of Water
 I really like adding layer upon layer and watching a image change. 
I thought this Water Overlay gave a ghostly fire effect, so I went with it.


I then selected  Texturize option 133 - Rusted Metal 2
 I adjusted this layer down low so it did not overpower 
the scene yet still added a fiery glow.


This is what the image looked like when I saved it; 
however it still needed a little something so I opened up another
applications to give it a final touch.


One thing about iPhone Apps is that many of them are one pony shows, requiring the use of several different applications to create a final project.  My first project was fairly simple and only required 2 applications to complete; however the more complex creations I've seen others create take 4+ applications.


Photogene was the next application I went to 
(the third icon on the top)


 I uploaded my saved altered photo and then added in 
a subtle black frame to finish my new creation off.


 I saved this final rendition as my first
altered iPhone digital artwork.


I'm having a blast playing with these applications and hope
this will inspire others to use their iPhones to create some fun art.


Grins and Giggles,
  Evelyn

Thursday, January 13, 2011

Wedding Card Using Spellbinders Frames & Rubber Stamps

I've got a wedding to go to this weekend and needed a card to include with their gift; so I thought this would be a great time to break-in two of my new Christmas gifts.

I have a new Sizzix Big Kick and some cool Spellbinders Nestabilities cutting dies that I'm crazy about; so here is the card I created using some items I've had and my two new treasures.

 Wedding card using cutting dies, rubber stamps, foil stickers, pastels, 
decorative paper punch and pearlized cardstock.
Oh - and there is just a bit of glitter glue on the bells and bride.


I started by stamping my images on some light blue pearlized cardstock.  The shimmer of this paper is amazing in person but I just can't capture its true beauty, so I'll post several different pictures and scans to give you several views of how it looks.

The Rubber Stamps I used are by PSX 
(PSX is a retired stamp company)


I ran each of the stamped images through my Sizzix Big Kick
using Spellbinders Nestabilities Labels 10

 I used the smallest die to cut out the blue pearl cardstock and then the next size up to cut white pearl cardstock mats to act as a frame for each stamped image.  


I really like the fact that I get several sizes of dies that cut and emboss; which gives the finished die cut a quality look and feel that is not flat.  I can also use the die as a stencil to give my cut and embossed item even more depth.  Ya, I'm having fun with these.

 The first pearl white tag has been embossed and the second has been embossed and stenciled.  The embossing alone is nice; however this extra step of stenciling really makes the finished product pop.


 The stenciling can be done with chalk, pastels, inks and other items depending
on the look you are going for.

  I used The Stencil Collection Non-Smear Pastels and
an alligator tool with pom to do my stenciling with this project.


Here is a close-up of one of the elements to show the embossing and stenciling 
on both the blue and white tags.


Once I had all three "cameos" I matted them with more pearlized cardstock.

Bonus - I used double sided tape to mount everything and this pearly cardstock has a special satin finish that allows all the items to be removed without damaging the underlying mats.  This means all the "cameos" can be removed and used by the receiver for another project or on a scrapbook page if they choose to do so.


The fun white mat was created using the "Iron Eagle" Paper Shaper
Corner Adorner punch by EK Success


Silver foil stickers were the final embellishment for the card.
 
Here is another view of the card taken without the flash.
The pearl effect of the cardstock is not very visable in this shot;
however you do see the embossing and stenciling a bit differently.


I seem to collect these great foil stickers from Holland.  They add that extra something to projects and  help finish them off when you're not sure what else to do.  I have them in a variety of styles and metallic colors.

 I used the above foil stickers for my card.
The end rows have been used or partially used so you can see the negative image left behind.
The negative portions can also be used if you are careful in cutting it away from the row next to it.


 I have several custom stamps I use to finish my work off with;
these are the two I used for this card.

 I ordered these stamps from PaperAngel
I stamped the Genuine Duncan first and the by Evelyn below it on the back of my card.


 Here is what the card looked like when I scanned it.
The scanner does not pick up the pearl look of the cardstock at all but
it gives you another way to view the finished card.


I have the wedding gift bought, the card made and my outfit ready to go, so till next time!


Grins and Giggles,
  Evelyn

Thursday, January 6, 2011

Happy New Year - 2011

It's a New Year and time for some new adventures!

Masked Lady Rubber Stamp from 100 Proof Press 
Markers and air tool used to create background
Glitter glue for some added sparkle 
The text was superimposed over scanned image using Photoshop
and I added color to her bodice, arm and face in Photoshop as well
(A bit of mixing the new with the old to start off 2011 on the right note).

2011 has begun with a slow start for me. I've been tied up putting away and cleaning up from Christmas 2010; then I woke up on Jan 4th (My Birthday) to discover my computer had died during the night.

My home office is now a mess but Happy Birthday to me - I have a new computer. My old files have been recovered and place on the new machine and I'm learning how to use Windows 7.  This will be a bit of a trial for me over the next week or so till I get acclimated but it has also inspired me to focus on creating digital art now that I have this more powerful machine and a huge 23" monitor.

I started to play around a bit with Photoshop at the end of 2010; so for 2011 my goal is to actually learn Photoshop and create a lot more art with it. I'm enthralled by the versatility of digital design and want it to become a viable tool in my artists pallet. (I'll share what I learn along the way.)

I figure the best way for me to dig in and learn will be a combination of books, online tutorials and browsing the web.  I've been inspired by the digital scrapbooking community and all the products and tutorials they have available.  To kick off 2011 and get my creative digital focus tuned in; I've purchased a whole collection of wonderful products from ScrapGirls.com


I also want to spend much of 2011 exploring art creations with a Steampunk theme, so many of my purchases were with that in mind.  

I've included links on the items; however if some of them no longer work it could be that ScrapGirls no longer offers the set or has since change the link on their end so you may want to go directly to their website and search for yourself.
 

I started with this great pack of 
Steampunk inspired papers, embellishments and word art
(everything in this pack works together so instead of wasting time trying to figure out what works with what I can spend some time actually learning how to layer and build in Photoshop to create new works of art with that Steampunk feel.)

and then added the following items to my collection..
 

 I just could not resist these Steampunk letters - Too Fun!

ScrapGirls even offers commercial licenses on their products if you need that option, so 
for this set you would go to this link HERE or you can go to their site and search 
for products with commercial licensing.
 
A classic vintage typewriter alphabet and some extra elements
 
A bunch of Sprockets, Cogs, Wheels and Gears


Frames, Signs and Alphabet Additions.
 I want to create mostly Victorian, Vintage and Steampunk looking art right now, so for me these elements offer a lot of versatility.
A nice collection of vintage photography mats

A collection of vintage frames that work with the above mats.
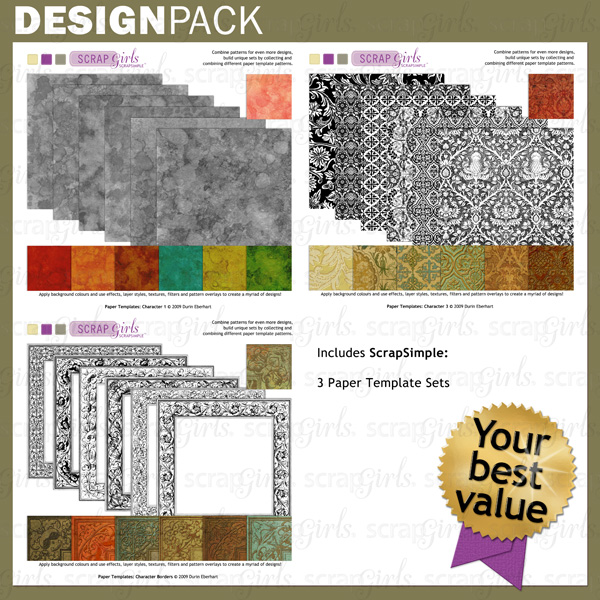
The above frames and mats were available as ScrapSimple Templates 
 or as Embellishment packs.
(Templates let you customize the items with the colors and textures you want)  
I choose Templates since I will want to create them in the color pallet and textures 
of my choosing using some of the "Styles" I purchased below.

 
I look forward to having fun learning how to customize and interchanging the various building blocks from all of the additional ScrapSimple Templates I purchased below. 
(My hope is that I will be able to easily mix and match elements to give me more variety and since several of the sets were made to work with one and other I believe this will prove to be the case.)
More vintage frames and bonus calendar for 2011
(I almost overlooked this set since it was a Calendar Set but I loved some of the 
shapes and the fact that you get 12 fancy frames, finally sold me on it)


Parts and pieces of Vintage Signs
 
More Banners and Signs with a vintage look


Alphabet and small boxes that work with the above elements
 
Mini Oval Frames to work with the above alphabet and elements


Papers and backgrounds are also necessary to this creative process so here again I wanted a variety of items that would work together, had a vintage feel and I could color however I wished.


A collection of background papers and frames that work together
 
Some great Victorian patterns for paper and backgrounds
 
Some great vintage looking textures to create papers and backgrounds with.
 
Great Crackle backgrounds for that true Vintage feel
 
Cool Retro patterned paper - already colored and ready to use that I can 
combine and layer with some of my other purchases


Brushes are a fun tool to use in Photoshop so I 
treated myself to this unusual 
set which has a bit of a Steampunk feel to it.

These come as both brushes and png files for Photoshop
Add a few wheels and gear elements and these would be very Steampunky 
Styles is another fun Photoshop

Some funky metallics to add to my Photoshop  - Styles pallet
This will be great on frames, borders, and other objects

Some classic looks to add to my  Photoshop  - Styles pallet
 Additional metal looks to add to my  Photoshop  - Styles pallet


Step 1 was making the purchases.  
Step 2 was loading the files to my computer and organizing them.
Step 3 was installing the Brushes and Styles into Photoshop on my computer
Step 4 will be learning how to use, layer and create with all these items.
Step 5 will be creating fun new art.
Step 6 will be sharing my creative journey and mishaps as I go.

Grins and Giggles for the New Year,
 Evelyn

Tuesday, December 28, 2010

Hand Carved Thread Spool Santa - Vintage Find

While I was on Christmas vacation, I was wandering in some quaint shops in Seneca, SC and came upon some interesting vintage thread spools that had been carved with Santa faces.  I thought they were cute at the time but seeing as they had been turned into key chains, I didn't buy one.  Only after I got back home did their images keep going back through my mind and now I wish I had purchased one and turned it into a tree ornament.

Oh, well that is the way it goes sometimes...so I got on the web today to see what I could find on hand carved Santa thread spools and was surprised to see so many options out there for me to choose from.

 I just loved this eBay find - hand carved by Gayle Roush


 This is the top view of the above Santa - showing the vintage thread label.


This fun thread spool carved Santa is by Bayou Creations


 This Carved Santa on Thread Spool is by Touch of Color Knowtes


 And then I found a great page showing how these are carved.

 Step by step as a Santa Face is carved.
By Barbara of Touch of Color Knowtes.
Click HERE for link to see step by step instruction on carving a thread spool.

The Finished Santa by Barbara of Touch of Color Knowtes.

I just might have to give this process a try in 2011.


 Grins, Giggles and Happy New Year!
 Evelyn